Streamline Your Workflow: Automating App Deployment to Google Drive with GitHub Actions
Overview
Recently, the software development landscape has undergone a remarkable transformation, improving the speed and efficiency of software development processes. One of these major improvements is the practice of Continuous Integration and Continuous Delivery (CI/CD), which has become very important in modern software development. Organizations worldwide have embraced these methodologies to replace time-consuming manual deployment processes with automation.
This article focuses on how GitHub Actions as a CI/CD tool can automate the deployment of apps to Google Drive. In a world where time is of the essence, understanding these cutting-edge tools can be very useful for developers and organizations seeking to accelerate their software deployment processes.
Prerequisites
Hands-on experience with mobile development: It is important to have some experience with mobile app development.
Familiarity with Github actions: To get the best out of this article, ensure that you have a basic understanding of Github Actions and Github workflows.
These prerequisites form the building block for seamless automation of your app deployment to Google Drive.
1.0 Set up your workflow file
This step includes creating your files and adding the initial default code for your workflow configuration to work as expected.
1.0.1 Create a workflow file
You can create your workflow file in two distinct ways:
A. Setting Up your Project Workflow from your local IDE:
Navigate to the root of your project directory.
Create a new file and name it '.github/workflows/deploy-to-drive.yml'. This file will serve as your GitHub Actions workflow Configuration where all the necessary code needed to set up your app for development is included.
B. Setting Up your Workflow from your Remote Github Repository:
For a more straightforward approach that eliminates the need to go to your local project, go to your GitHub repository, click on the "Actions" tab and select "Set up a workflow yourself".
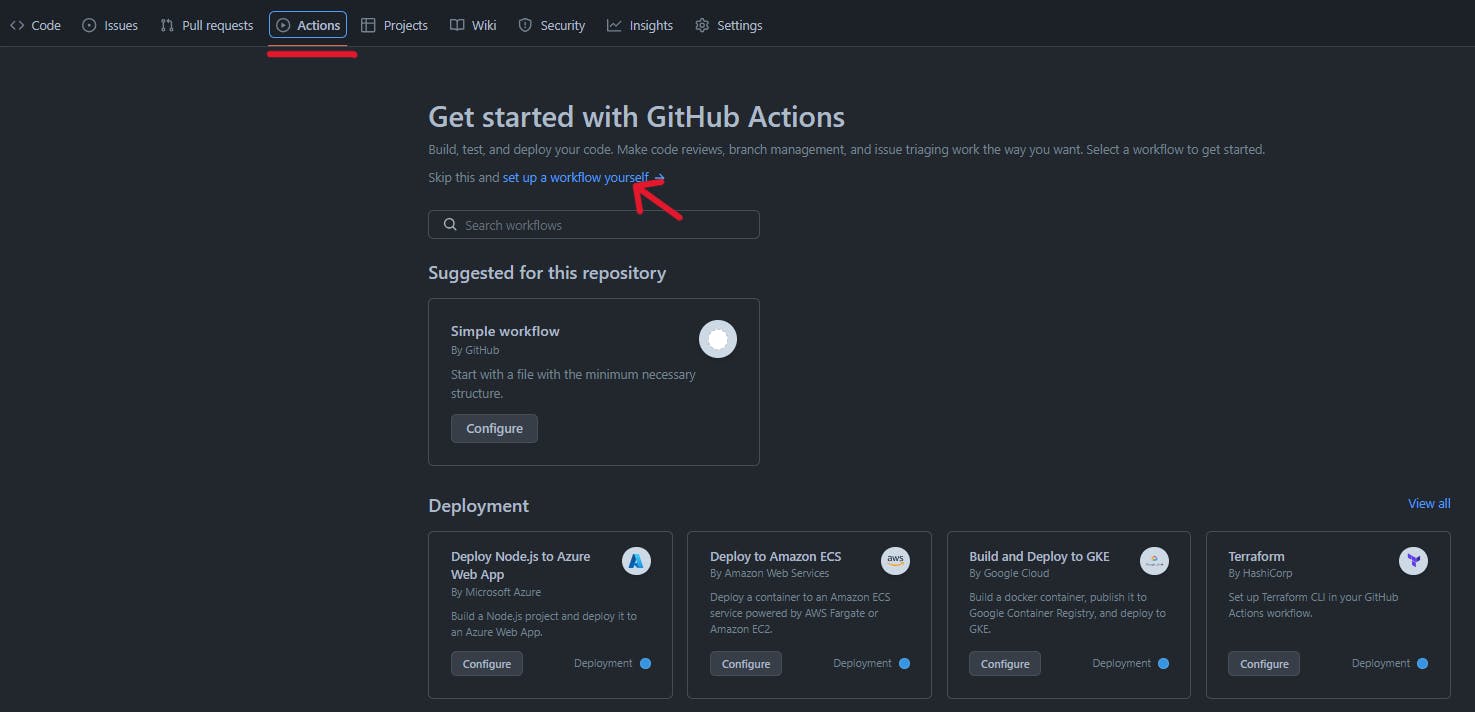
You can rename it to suit your needs but it must take the '.yml' suffix(here I named it "deploy-to-drive.yml"), and commit your changes
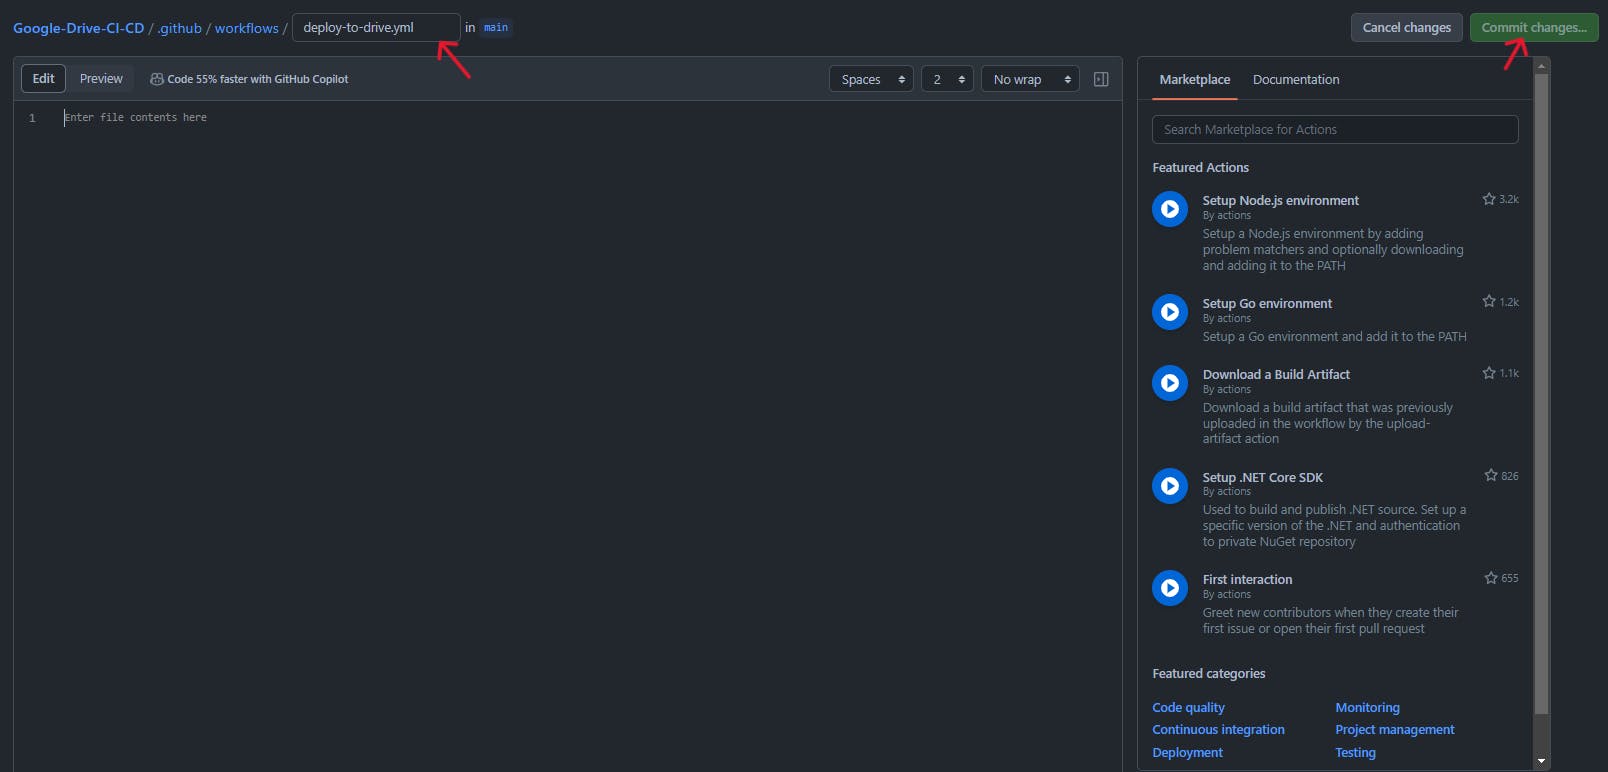
1.0.2 Initializing your workflow job
To initialize your workflow, follow these steps:
To the 'deploy-to-drive.yml' file you created in your project or your remote repository, add the following code snippet:
 name: Build Google-Drive-CI-CD
 on:
   workflow_dispatch:
     inputs:
       google_drive:
         description: 'Upload apk to google drive'
         required: false
         type: boolean

 concurrency:
   group: ${{ github.workflow }}-${{ github.ref }}
   cancel-in-progress: true

 jobs:
   development:
     runs-on: ubuntu-latest
     steps:
       - uses: actions/checkout@v3

       - name: set up JDK 17
         uses: actions/setup-java@v3
         with:
           java-version: '17'
           distribution: 'temurin'
           cache: gradle

       - name: Grant execute permission for gradlew
         run: chmod +x gradlew

       - name: Build APK
         uses: gradle/gradle-command-action@v2
         with:
           arguments: assembleDebug
I'll briefly explain what this code does:
In this workflow, you show a series of automated tasks for your project.
`on`: This section defines when the workflow should be executed. In this case, it is set to trigger manually when a workflow dispatch event occurs, allowing you to be flexible with workflow initiation, meaning you can execute your workflow even from your mobile device. The workflow dispatch button usually shows up in the top right of your workflow file, which you'll see later on.`concurrency`: It helps to manage concurrency in your workflow meaning you can run multiple workflows with the same name without overlapping.`jobs`: The workflow defines a single job named 'development' that will run on the 'ubuntu-latest' virtual machine. It consists of several steps:actions/checkout@v3: This involves checking out your source code from your repository before starting a build.chmod +x gradlew: This step involves granting permission to the gradle wrapper which is needed for your app to build.gradle/gradle-command-action@v2: This command is used to build your project APK. It also involves specifying the build type (assembleDebug) you desire as an argument.
2.0 Setting up Google Cloud Platform(GCP) for your App
GCP is a cloud computing platform that offers a variety of tools and services that empower developers to build, automate and scale the development of their software flexibly and efficiently. One such tool is the Google Drive API which facilitates a seamless integration of your projects with Google Drive.
If your app is a Firebase project then it is automatically linked with the GCP. However if your app is not yet integrated, you can follow these steps to create a new GCP project:
Navigate to the GCP console.
On this screen, click on the projects dropdown at the top left corner of your screen
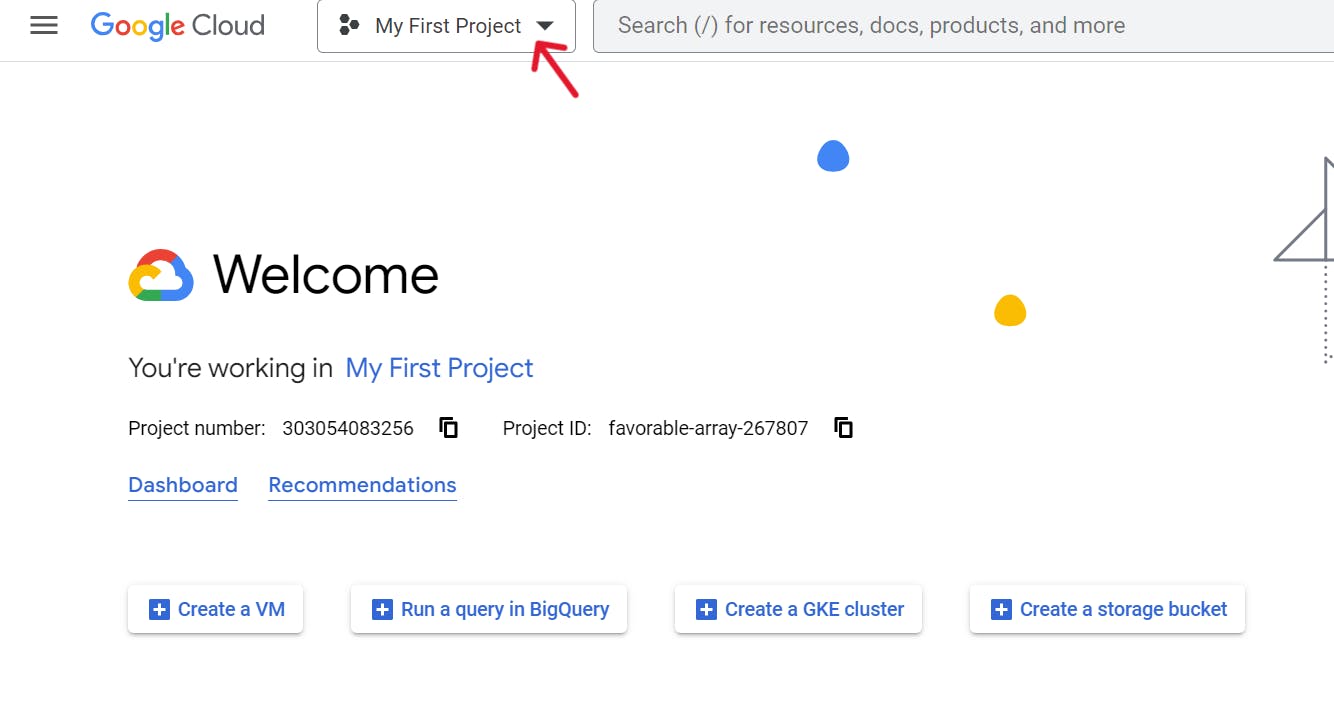
Then create a new project on the next screen:

Name your new project and select 'create'
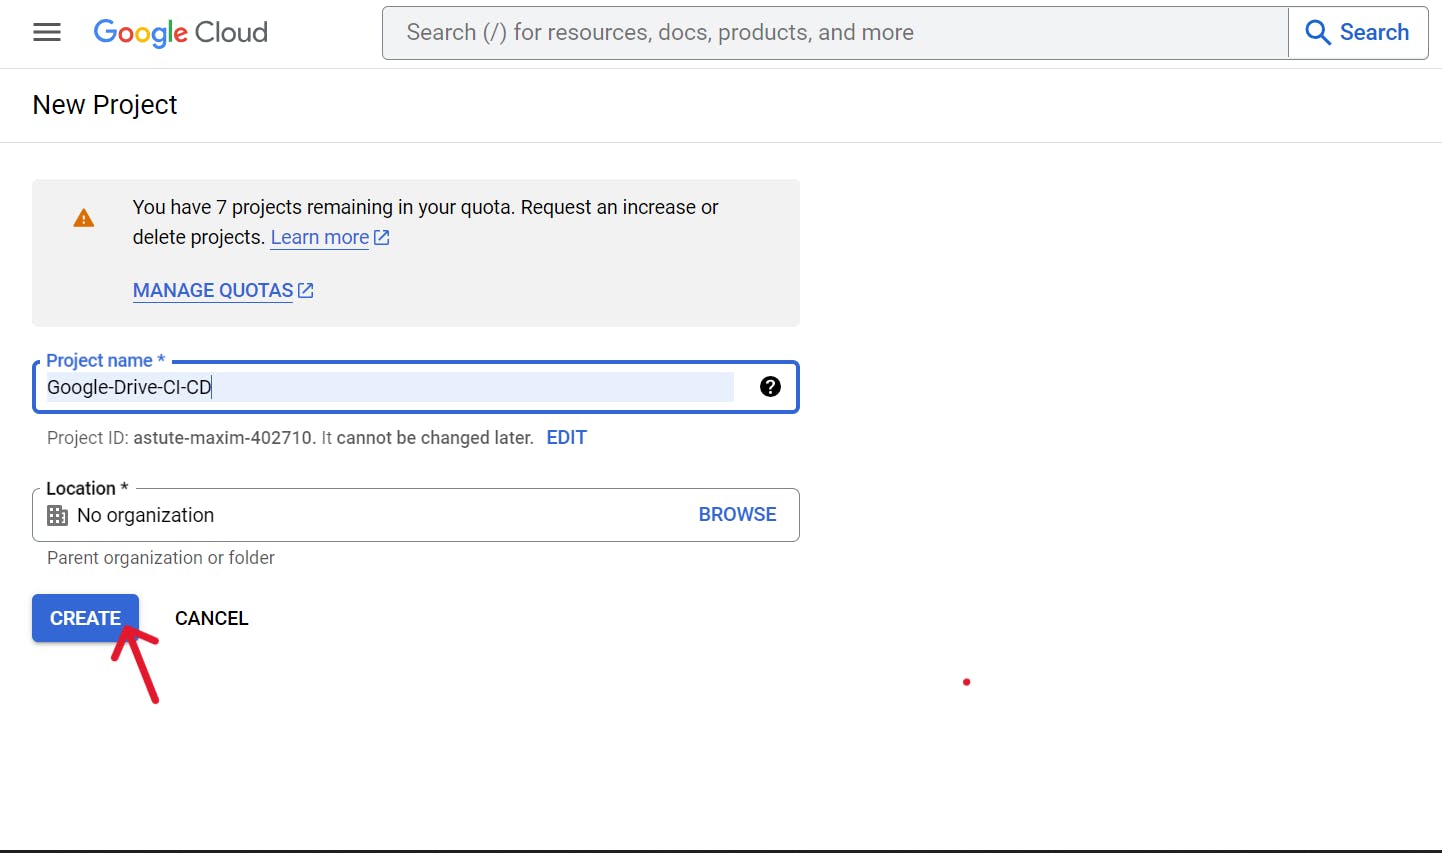
Click on 'Select Project' on the notification message on the next screen which takes you to the project dashboard.

On the next screen, click on 'Api and Services', then click on 'Enable Api and Services'.

On the next screen, search for Google Drive API in the Search bar, click on it, and enable the API.
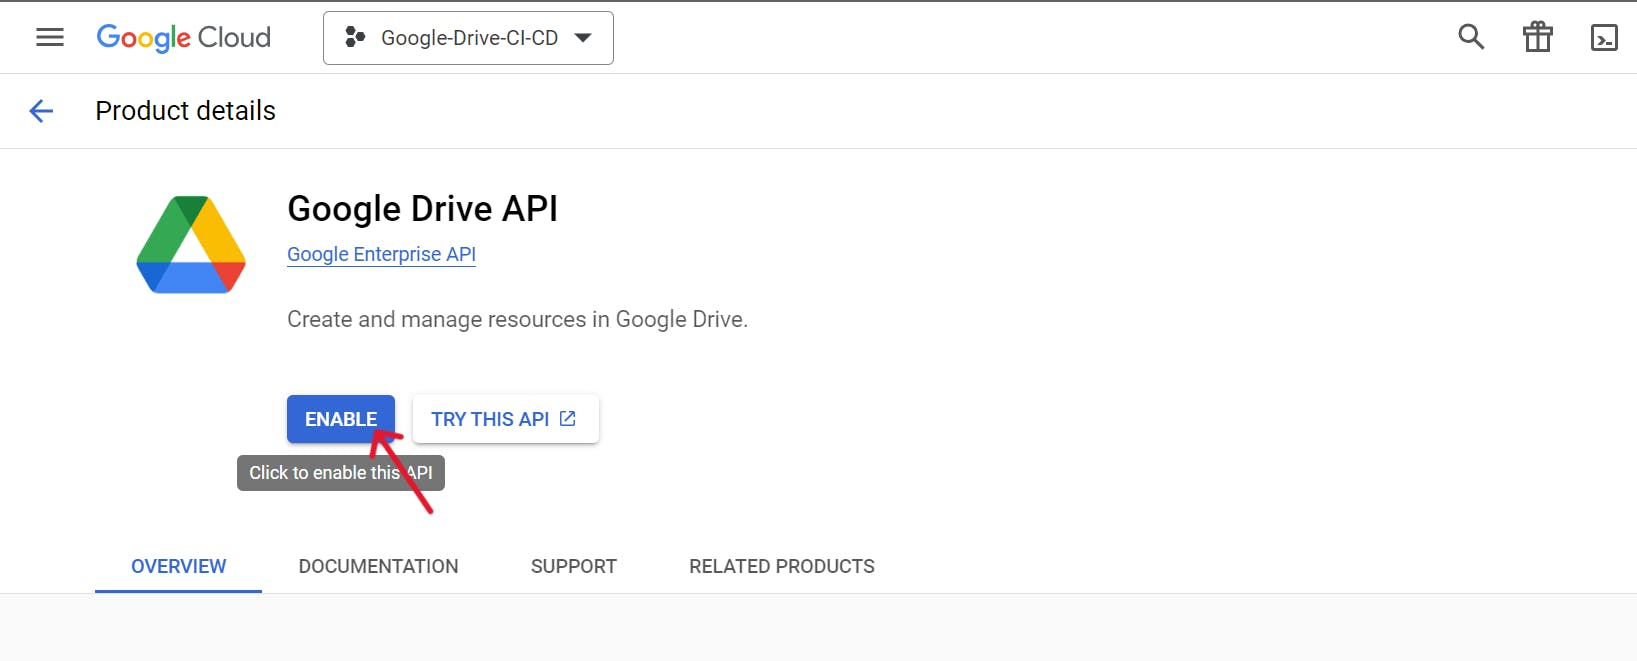
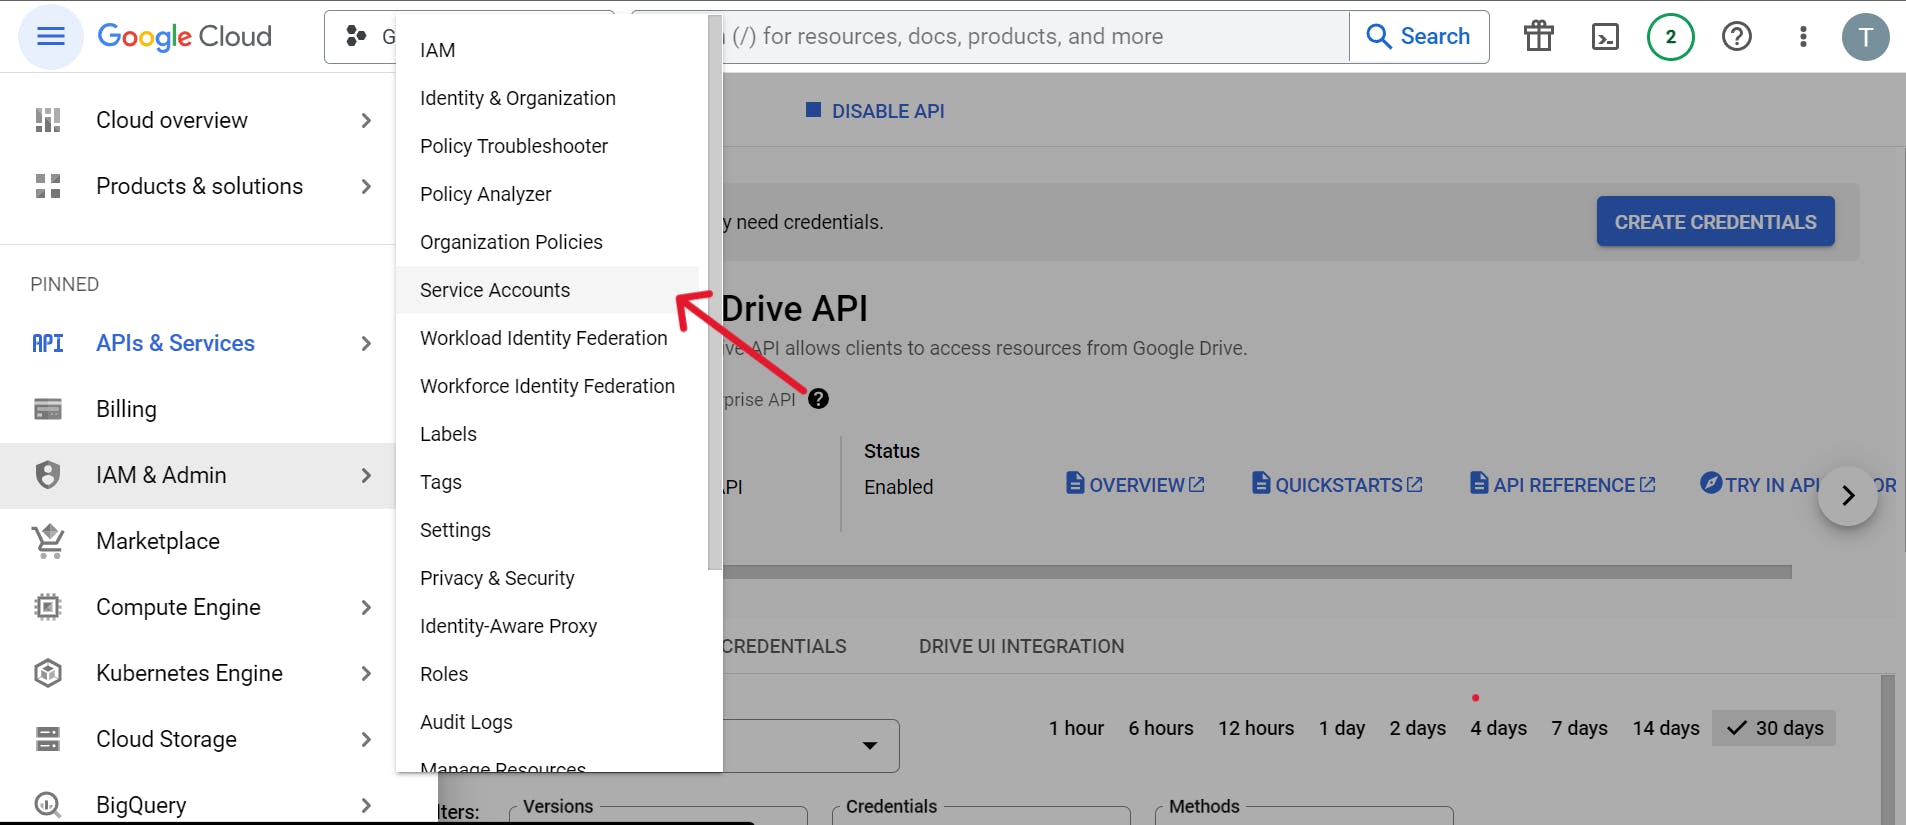
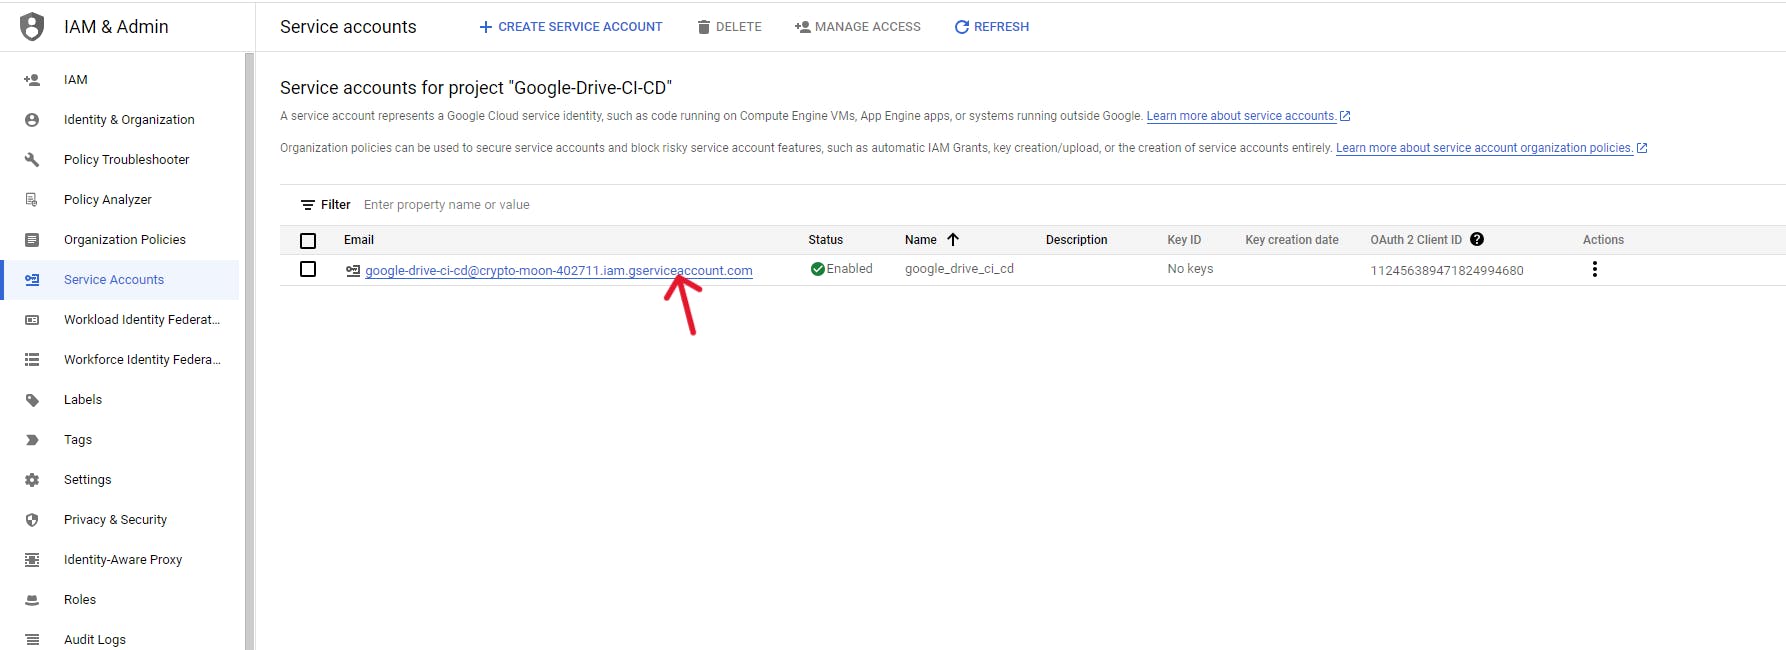
Next, click on the left side navigation drawer of the screen and click on 'I AM & ADMIN', then 'Service Accounts'
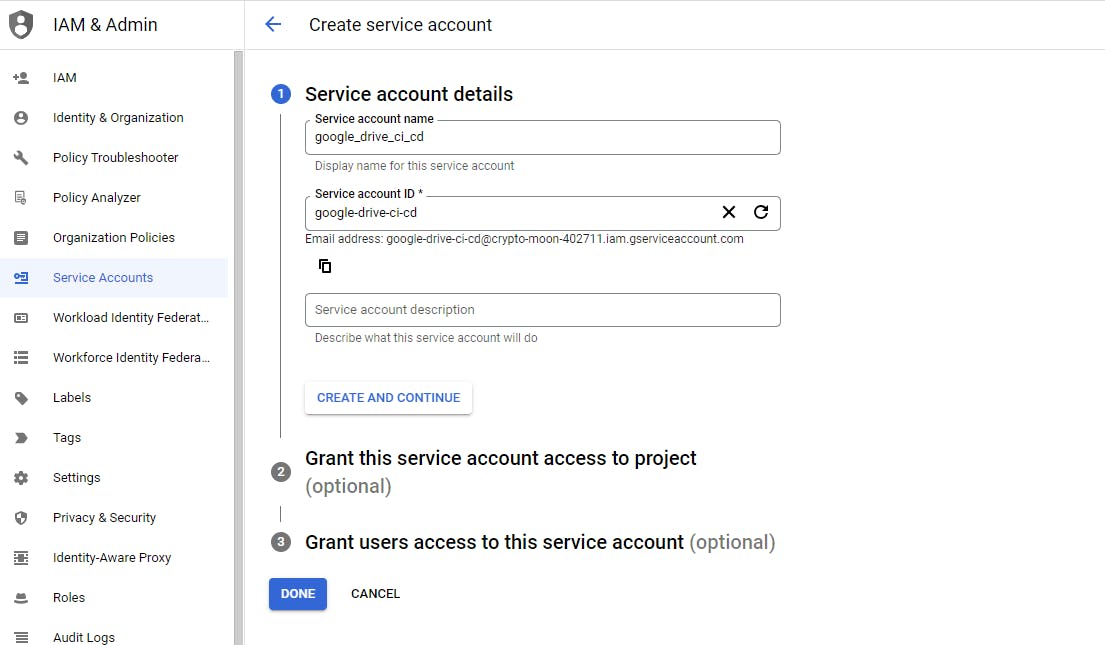
On the opened page, click on 'Create service account' and this takes you to the Create account screen. On this screen, fill in your desired service account details, which can be anything and click 'create and continue' then 'done'. This takes you to the home page.
On the next screen, click on the email which takes you to the service details screen, then create a key
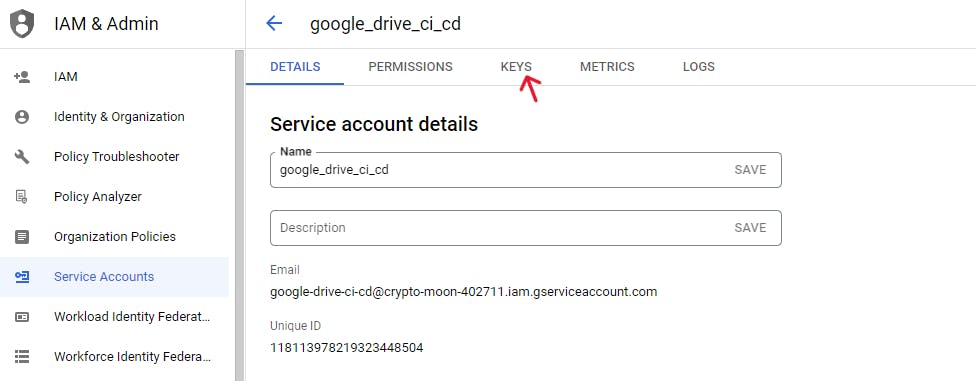
Click on the add key button on the next screen, then click on the 'JSON' option in the shown dialog, then select 'create'.
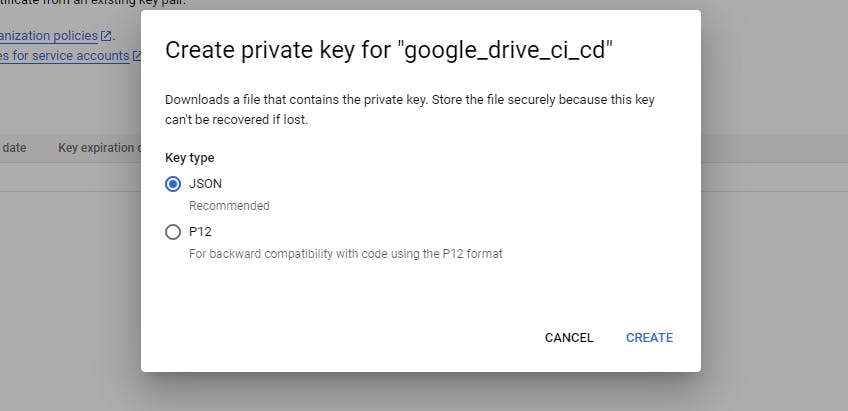
This creates and downloads a JSON file which will be used later to create your GCP credentials and secret keys in your GitHub workflow.
3.0 Set up your Google Drive Folder
Thumbs up for making it this far. The core aspects of this process have been dealt with. Next, to get your workflow to work in sync with Google Drive, you also have to handle the Google Drive side of things. This is pretty simple.
Go to your Google Drive and create a new folder, name it whatever name you want, that is where all your APKs will be saved after your app build. I'm naming mine Google-Drive-CI-CD
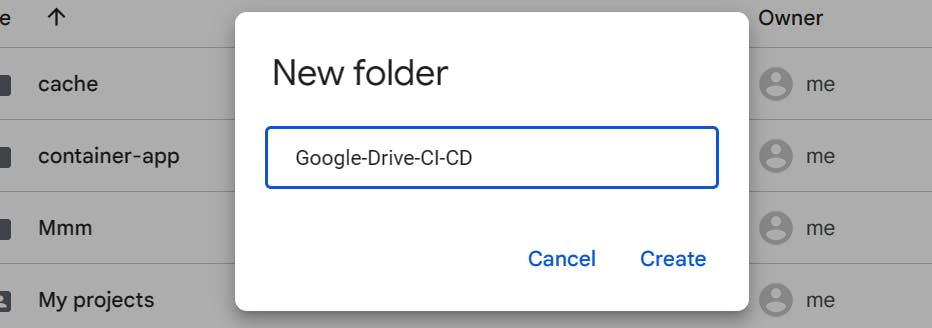
Next, enter the folder, click on the project dropdown to share, and insert the email of your app. In the marked text bar below, you'll put the app email there such that whenever there's a build, it is sent to that account attached to your GCP.
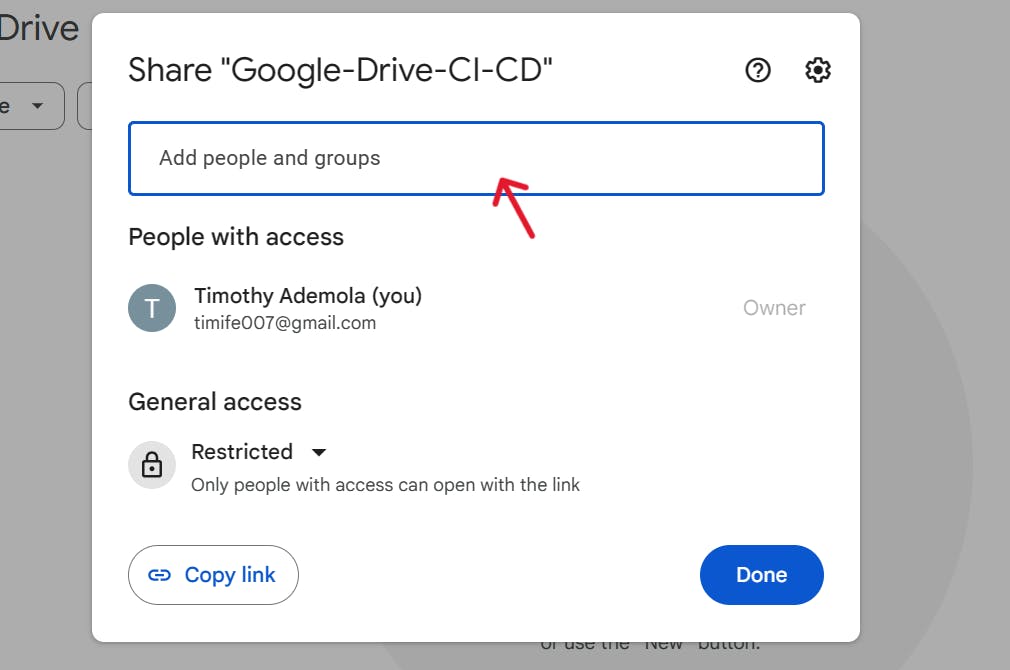
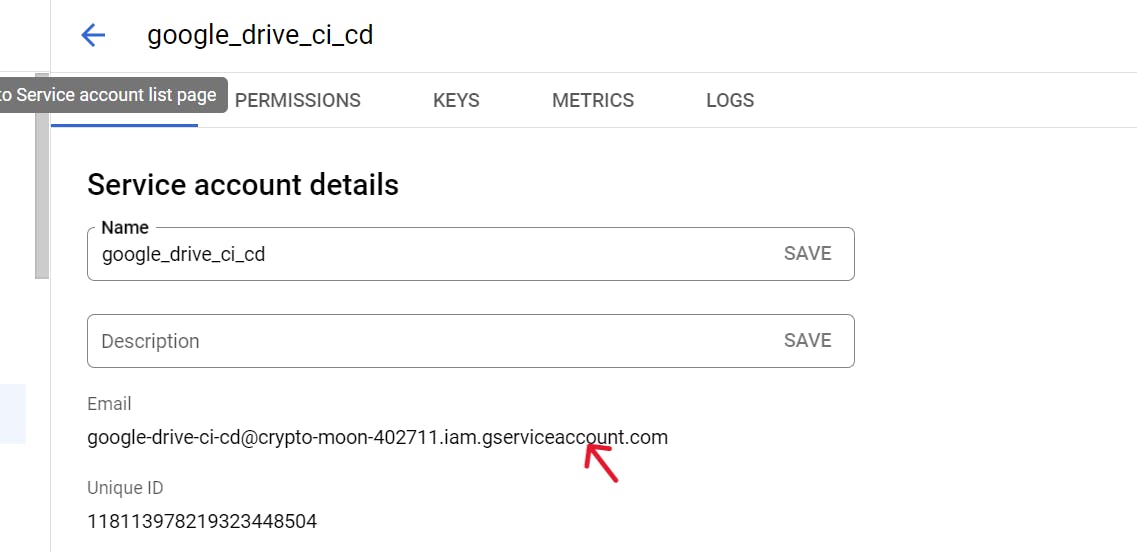
To get the app email, go to the service account details in your GCP console and copy it.
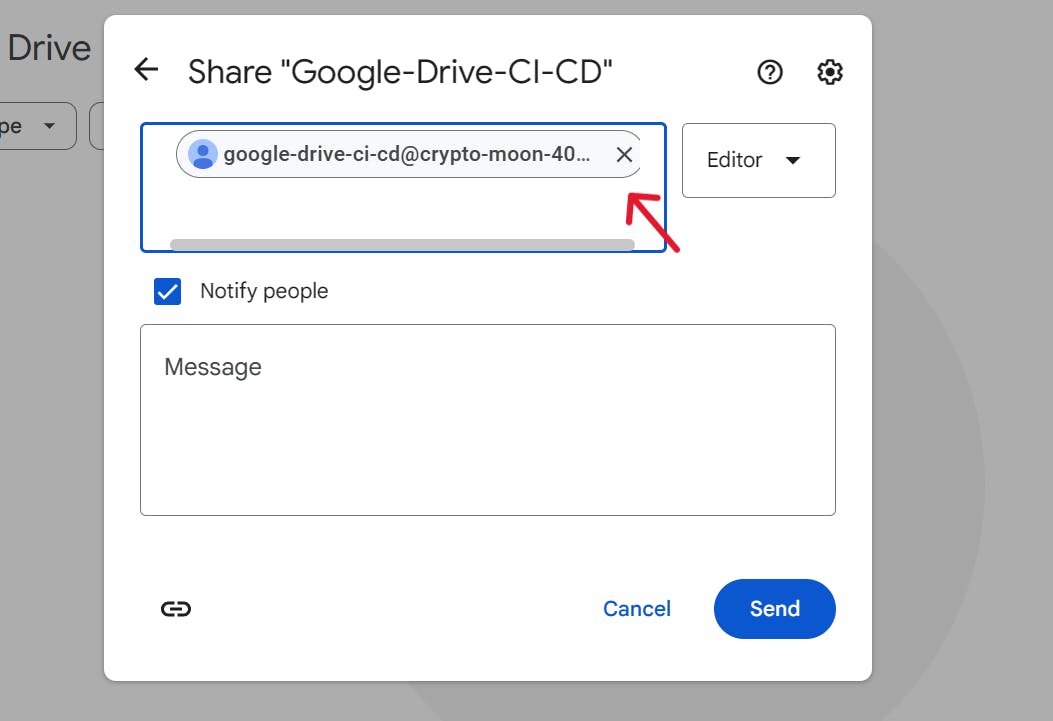
Paste the copied email into the text field above and click send
4.0 Managing Github Action Secrets
To ensure a smooth workflow operation and grant access to GCP and the Google Drive Folder, it's important to add specific credentials to your GitHub Secrets, as without these credentials your workflow won't function as expected. This step is essential in setting up a function CI/CD pipeline that involves deploying to Google Drive.
Navigate to GitHub Secrets
Within your GitHub repository, locate to "Settings" tab and access "Secrets and Variables". Click on the "New repository secrets" button under the "Actions" category.
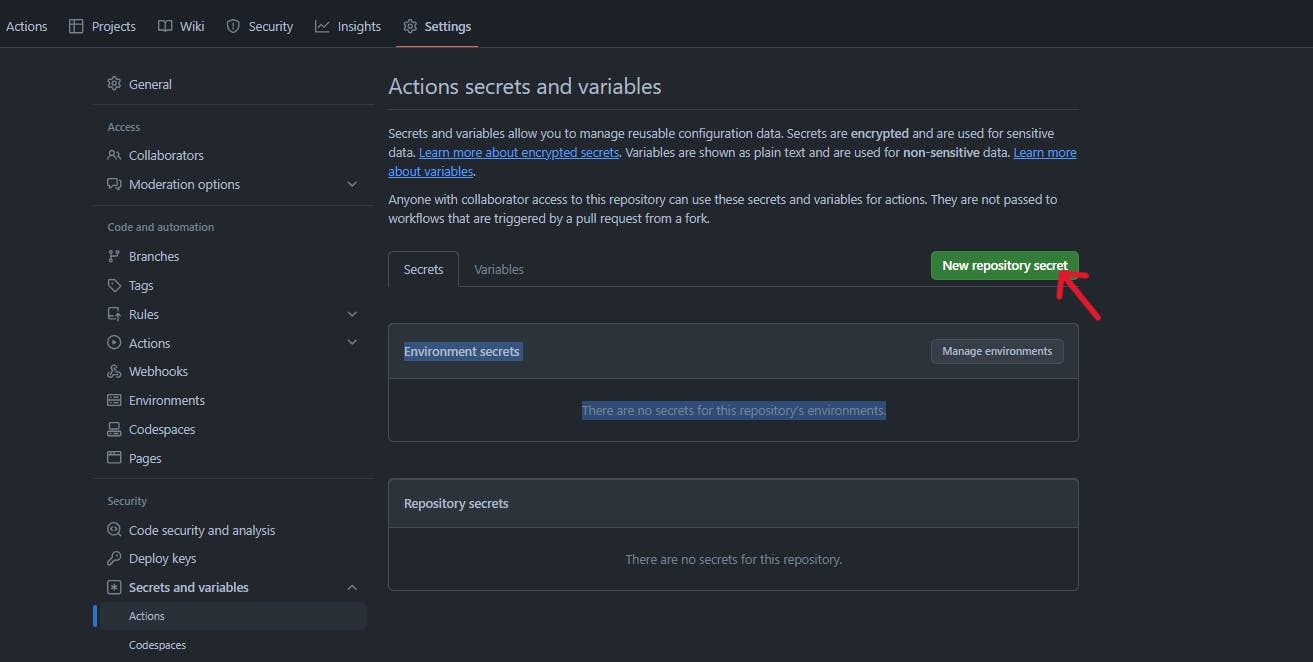
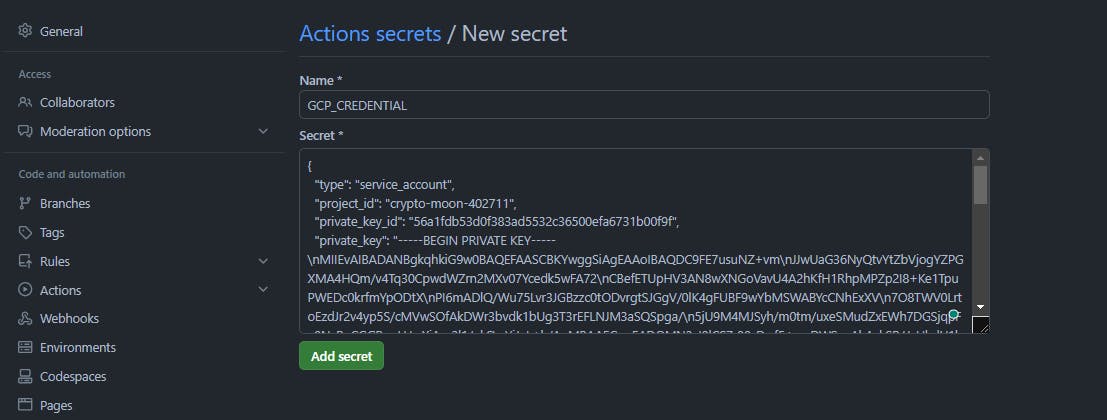
Get your GCP credentials and add it as a secret.
Recall that, when creating your GCP key, a JSON file was downloaded. This JSON file will be your GCP credential; you need it for seamless communication with the GCP. Now, open the file, copy its content paste your secrets text field, name it anything, and click on the "Add secret" button to proceed.
Obtaining and adding your Drive folder ID.
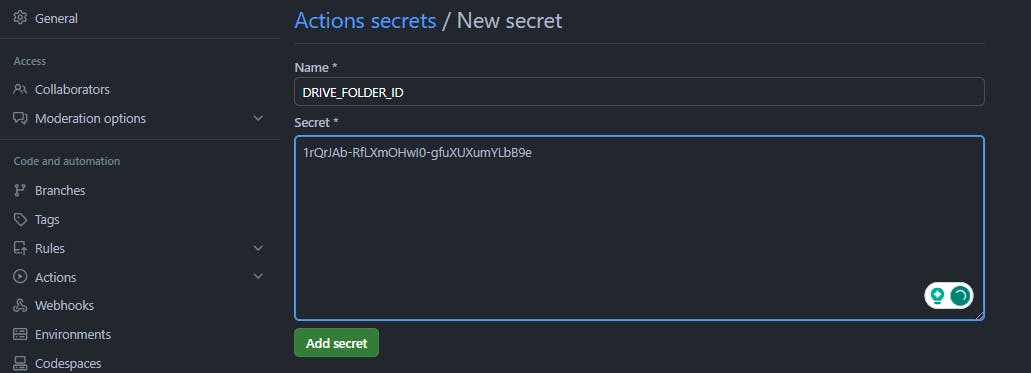
You need to locate and copy the unique drive ID. This is essential for smooth access to your Google Drive folder.
A. Open your newly created Google Drive Folder, and copy the path on the Folder URL. The last part of the URL represents your Drive Folder ID.

B. Next, create another repository secret by following the previous process and paste the copied Folder ID there. Save the secret. It will now be accessible for your workflows.
5.0 Configure your Workflow with the Google Drive Deployment Job
To enable your workflow set up to work, you'll need to configure the "drive development" job. Follow these steps to ensure a seamless and correct setup:
Open your workflow file i.e. the .github/workflows/deploy-to-drive.yml file.
Add the following code snippet to your workflow file.
Be sure to replace each field with your personalized credentials, like the names of your saved repository secrets (i.e.
folderIDandGCP_CREDENTIAL), yourfilenameshould reflect the unique file location of your APK file after the build process. Theoverwritefield is used to specify if you want your APK file to be overwritten in the Google Drive folder or if you want each build to create a new version.This setup ensures the secure and precise execution of your development process.
 -name: Upload apk to Google Drive
  uses: logickoder/google-drive-upload@test
  with:
    credentials: ${{ secrets.GCP_CREDENTIAL }}
    filename: "app/build/outputs/apk/debug/app-debug.apk"
    folderID: ${{ secrets.DRIVE_FOLDER_ID }}
    overwrite: "true"
Verify Credential Consistency
Ensure that all the filled credentials match precisely. Even a little discrepancy can cause a workflow failure, hence, stopping your deployment process.
Commit your Workflow Changes
Once you have verified the accuracy and consistency of your code snippet, commit your work changes either from your GitHub or your local project. If you're using the local project, ensure to push your update to the remote repository.
6.0 Test your workflow
Thumbs up for reaching this point, you have made excellent progress. Your workflow is now complete and it should work seamlessly.
To verify its functionality, you can trigger it manually from your GitHub Repository. Follow these steps:
Navigate to workflow
Go to the "Actions" tab in your GitHub repository and locate the workflow in the sidebar. Click on it to see the workflow dispatch trigger

Event Trigger for Execution
As previously stated, event triggers are for manual execution of the workflow and that is exactly what I'll be showing you here. On the next screen, your workflow trigger button will be visible. Click on the "Run workflow" button to see and access your options.

The underlined text notifies you of the workflow dispatch event trigger. Next, select your desired branch to run the workflow in case you have more than one branch, and check the "Upload apk" box. Next, click on the "Run workflow" button, this sets up your workflow for execution.
Track your Workflow progress
You can track your current workflow progress by filtering the status status. This helps to have easy access to the status of your workflow and ensures smooth execution.

You can then click on the workflow itself to check for the progress of the workflow. A yellow workflow indicator indicates progress, a red sign indicates failure and a green one indicates success.

Clicking on it takes you to the workflow job and then the workflow details:

The above snippet shows a successful workflow execution.
Check your Google Drive Folder
To confirm the success of your execution, go to your Google Drive Folder to check. Having your APK file in this folder shows a successful deployment.

Conclusion
Big thumbs up on this thrilling journey through the intricacies of automating and deploying your app to Google Drive with GitHub Actions. In this journey, we have learned and delved into the power of Github Actions and automation. From configuring workflows to securing credentials and manual triggers with Workflow Dispatch, you have set forth a path that leads to streamlined integration and deployment. I believe the thrill of automation, and the insights gained here will empower you to venture further into the unending possibilities of working with GitHub Actions.
If you found this article helpful and informative, please consider showing your appreciation by giving it a 'like'. Your engagement fuels my commitment to providing valuable content. Thank you for your support and Happy Coding!
